GUI vs CLI
GUI
VNC
- Virtual Network Console 让用户可以远程访问服务器的桌面环境
- VNC Server / VNC Client (Viewer)
- VNC 是把被控制端的屏幕做成图像,经过压缩后传送到控制端,控制端的控制信息(如鼠标信息)传送到被控制端后进入消息队列。
和 ssh -X 的区别
- VNC导出整个会话,桌面和所有,而ssh将运行一个程序,并在您的工作站上显示它的窗口。
- ssh -X重定向X11命令到您的本地X服务器。所以这就像是你在本地运行程序,而它实际上是在另一端的计算机上运行的。它非常慢,因为它使用了大量的带宽。
- VNC和其他远程桌面应用程序则让其他计算机处理所有的图形绘制等等,并捕捉屏幕截图,并将其发送回您的计算机。它看起来要快得多,因为显示所有内容所需的信息要少得多。然而,它也发送整个桌面,而不是单个应用程序。
- 不推荐在Internet上使用ssh -X,原因很简单:它会占用您所有的可用带宽。在我看来,它在局域网中相当有用,所以如果你只需要一个应用程序,而不想运行整个桌面,这是一个很好的方法。否则,就使用VNC。
CLI
- Shell
- zsh - z shell
- bash - Bourne Again shell
- sh - Thompson shell
- fish
- zsh(Z shell)是bash的一个替代品,他对于bash有了很多的优化,无论是使用命令,外观,体验,能够让用户更方便顺畅的使用Terminal。
- 通过使用 oh-my-zsh 扩展,
                                    sh   csh  ksh  bash tcsh zsh  rc   es
Job control                          N    Y    Y    Y    Y    Y    N    N
Aliases                              N    Y    Y    Y    Y    Y    N    N
Shell functions                      Y(1) N    Y    Y    N    Y    Y    Y
"Sensible" Input/Output redirection  Y    N    Y    Y    N    Y    Y    Y
Directory stack                      N    Y    Y    Y    Y    Y    F    F
Command history                      N    Y    Y    Y    Y    Y    L    L
Command line editing                 N    N    Y    Y    Y    Y    L    L
Vi Command line editing              N    N    Y    Y    Y(3) Y    L    L
Emacs Command line editing           N    N    Y    Y    Y    Y    L    L
Rebindable Command line editing      N    N    N    Y    Y    Y    L    L
User name look up                    N    Y    Y    Y    Y    Y    L    L
Login/Logout watching                N    N    N    N    Y    Y    F    F
Filename completion                  N    Y(1) Y    Y    Y    Y    L    L
Username completion                  N    Y(2) Y    Y    Y    Y    L    L
Hostname completion                  N    Y(2) Y    Y    Y    Y    L    L
History completion                   N    N    N    Y    Y    Y    L    L
Fully programmable Completion        N    N    N    N    Y    Y    N    N
Mh Mailbox completion                N    N    N    N(4) N(6) N(6) N    N
Co Processes                         N    N    Y    N    N    Y    N    N
Builtin artithmetic evaluation       N    Y    Y    Y    Y    Y    N    N
Can follow symbolic links invisibly  N    N    Y    Y    Y    Y    N    N
Periodic command execution           N    N    N    N    Y    Y    N    N
Custom Prompt (easily)               N    N    Y    Y    Y    Y    Y    Y
Sun Keyboard Hack                    N    N    N    N    N    Y    N    N
Spelling Correction                  N    N    N    N    Y    Y    N    N
Process Substitution                 N    N    N    Y(2) N    Y    Y    Y
Underlying Syntax                    sh   csh  sh   sh   csh  sh   rc   rc
Freely Available                     N    N    N(5) Y    Y    Y    Y    Y
Checks Mailbox                       N    Y    Y    Y    Y    Y    F    F
Tty Sanity Checking                  N    N    N    N    Y    Y    N    N
Can cope with large argument lists   Y    N    Y    Y    Y    Y    Y    Y
Has non-interactive startup file     N    Y    Y(7) Y(7) Y    Y    N    N
Has non-login startup file           N    Y    Y(7) Y    Y    Y    N    N
Can avoid user startup files         N    Y    N    Y    N    Y    Y    Y
Can specify startup file             N    N    Y    Y    N    N    N    N
Low level command redefinition       N    N    N    N    N    N    N    Y
Has anonymous functions              N    N    N    N    N    N    Y    Y
List Variables                       N    Y    Y    N    Y    Y    Y    Y
Full signal trap handling            Y    N    Y    Y    N    Y    Y    Y
File no clobber ability              N    Y    Y    Y    Y    Y    N    F
Local variables                      N    N    Y    Y    N    Y    Y    Y
Lexically scoped variables           N    N    N    N    N    N    N    Y
Exceptions                           N    N    N    N    N    N    N    Y
shortcuts
- https://www.howtogeek.com/howto/ubuntu/keyboard-shortcuts-for-bash-command-shell-for-ubuntu-debian-suse-redhat-linux-etc/
最常用
- Ctrl-R 搜索运行的历史命令
- Ctrl-C - SIGINT
- Tab
- Ctrl-Z 暂停当前运行的任务,使用 fg 或者 bg 恢复 - SIGTSTP
- Ctrl-D 关闭bash shell。这将向bash发送一个EOF(文件结束符)标记,bash在收到这个标记时退出。这类似于运行exit命令。
- Ctrl+L: Clear the screen.
- Ctrl+S: 停止所有输出到屏幕。当运行的命令输出很长、很冗长,但您不想用Ctrl+C停止命令本身时,这一点特别有用。
- Ctrl+Q:用Ctrl+S停止屏幕输出后,恢复屏幕输出。
其他
Moving the Cursor
- Ctrl+A or Home: Go to the beginning of the line.
- Ctrl+E or End: Go to the end of the line.
- Alt+B: Go left (back) one word.
- Ctrl+B: Go left (back) one character.
- Alt+F: Go right (forward) one word.
- Ctrl+F: Go right (forward) one character.
- Ctrl+XX: Move between the beginning of the line and the current position of the cursor. This allows you to press Ctrl+XX to return to the start of the line, change something, and then press Ctrl+XX to go back to your original cursor position. To use this shortcut, hold the Ctrl key and tap the X key twice.
Deleting Text
- Ctrl+D or Delete: Delete the character under the cursor.
- Alt+D: Delete all characters after the cursor on the current line.
- Ctrl+H or Backspace: Delete the character before the cursor.
Fixing Typos
- Alt+T: Swap the current word with the previous word.
- Ctrl+T: Swap the last two characters before the cursor with each other. You can use this to quickly fix typos when you type two characters in the wrong order.
- Ctrl+_: Undo your last key press. You can repeat this to undo multiple times.
Cutting and Pasting
- Ctrl+W: Cut the word before the cursor, adding it to the clipboard.
- Ctrl+K: Cut the part of the line after the cursor, adding it to the clipboard.
- Ctrl+U: Cut the part of the line before the cursor, adding it to the clipboard.
- Ctrl+Y: Paste the last thing you cut from the clipboard. The y here stands for “yank”.
Capitalizing Characters
- Alt+U: Capitalize every character from the cursor to the end of the current word, converting the characters to upper case.
- Alt+L: Uncapitalize every character from the cursor to the end of the current word, converting the characters to lower case.
- Alt+C: Capitalize the character under the cursor. Your cursor will move to the end of the current word.
Working With Your Command History
- Ctrl+P or Up Arrow: Go to the previous command in the command history. Press the shortcut multiple times to walk back through the history.
- Ctrl+N or Down Arrow: Go to the next command in the command history. Press the shortcut multiple times to walk forward through the history.
- Alt+R: Revert any changes to a command you’ve pulled from your history if you’ve edited it.
- Ctrl+R: Recall the last command matching the characters you provide. Press this shortcut and start typing to search your bash history for a command.
- Ctrl+O: Run a command you found with Ctrl+R.
- Ctrl+G: Leave history searching mode without running a command.
Install Software in CLI
Pacakge Manager
- apt, dpkg (ubuntu, Debian) - .deb
- brew (macOS)
- dnf (fedora) - .rpm
- yum (centos) - .rpm
Install from source
- README/INSTALL doc
- configure / make install
Pipe and Redirect
- I/O 重定向:
- < file 重定向 file 到 输入
- > file 重定向输出流到文件
- >> file 追加写到文件
- | 管道重定向,链接输出和输入
- 使用重定向过程中需要注意权限问题:
$ sudo find -L /sys/class/backlight -maxdepth 2 -name '*brightness*'
/sys/class/backlight/thinkpad_screen/brightness
$ cd /sys/class/backlight/thinkpad_screen
$ sudo echo 3 > brightness
An error occurred while redirecting file 'brightness'
open: Permission denied
- echo 等程序并不知道 | 的存在,它们只知道从自己的输入输出流中进行读写。 对于上面这种情况, shell (权限为您的当前用户) 在设置 sudo echo 前尝试打开 brightness 文件并写入,但是系统拒绝了 shell 的操作因为此时 shell 不是根用户。所以修改为:
$ echo 3 | sudo tee brightness
- 因为打开 /sys 文件的是 tee 这个程序,并且该程序以 root 权限在运行,因此操作可以进行。 这样您就可以在 /sys 中愉快地玩耍了,例如修改系统中各种LED的状态(路径可能会有所不同):
$ echo 1 | sudo tee /sys/class/leds/input6::scrolllock/brightness
Redirect 注意
- 一般情况下,每个 Unix/Linux 命令运行时都会打开三个文件:
- 标准输入文件(stdin):stdin的文件描述符为0,Unix程序默认从stdin读取数据。
- 标准输出文件(stdout):stdout 的文件描述符为1,Unix程序默认向stdout输出数据。
- 标准错误文件(stderr):stderr的文件描述符为2,Unix程序会向stderr流中写入错误信息。
- 默认情况下,command > file 将 stdout 重定向到 file,command < file 将stdin 重定向到 file。
- 如果希望 stderr 重定向到 file,可以这样写:
- 如果希望将 stdout 和 stderr 合并后重定向到 file,可以这样写:
- 如果希望执行某个命令,但又不希望在屏幕上显示输出结果,那么可以将输出重定向到 /dev/null:
Pipe
- 管道是UNIX环境中历史最悠久的进程间通信方式。
- 管道本质上就是一个文件,前面的进程以写方式打开文件,后面的进程以读方式打开。这样前面写完后面读,于是就实现了通信。实际上管道的设计也是遵循UNIX的“一切皆文件”设计原则的,它本质上就是一个文件。
- Linux系统直接把管道实现成了一种文件系统,借助VFS给应用程序提供操作接口。
- 虽然实现形态上是文件,但是管道本身并不占用磁盘或者其他外部存储的空间。在Linux的实现上,它占用的是内存空间。所以,Linux上的管道就是一个操作方式为文件的内存缓冲区。
- 管道一般又分为匿名管道和命名管道
- 匿名管道最常见的形态就是我们在shell操作中最常用的”|”。它的特点是只能在父子进程中使用,父进程在产生子进程前必须打开一个管道文件,然后fork产生子进程,这样子进程通过拷贝父进程的进程地址空间获得同一个管道文件的描述符,以达到使用同一个管道通信的目的。此时除了父子进程外,没人知道这个管道文件的描述符,所以通过这个管道中的信息无法传递给其他进程。这保证了传输数据的安全性,当然也降低了管道了通用性
- 于是系统还提供了命名管道。以使用
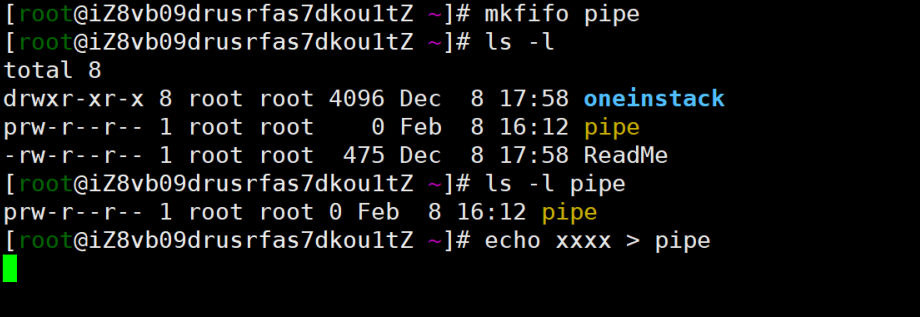
mkfifo 或 mknod 命令来创建一个命名管道。创建出来的文件类型比较特殊,是p类型。表示这是一个管道文件。有了这个管道文件,系统中就有了对一个管道的全局名称,于是任何两个不相关的进程都可以通过这个管道文件进行通信
[root@iZ8vb09drusrfas7dkou1tZ ~]# mkfifo pipe
[root@iZ8vb09drusrfas7dkou1tZ ~]# ls -l
total 8
drwxr-xr-x 8 root root 4096 Dec 8 17:58 oneinstack
prw-r--r-- 1 root root 0 Feb 8 16:12 pipe
-rw-r--r-- 1 root root 475 Dec 8 17:58 ReadMe
[root@iZ8vb09drusrfas7dkou1tZ ~]# ls -l pipe
prw-r--r-- 1 root root 0 Feb 8 16:12 pipe
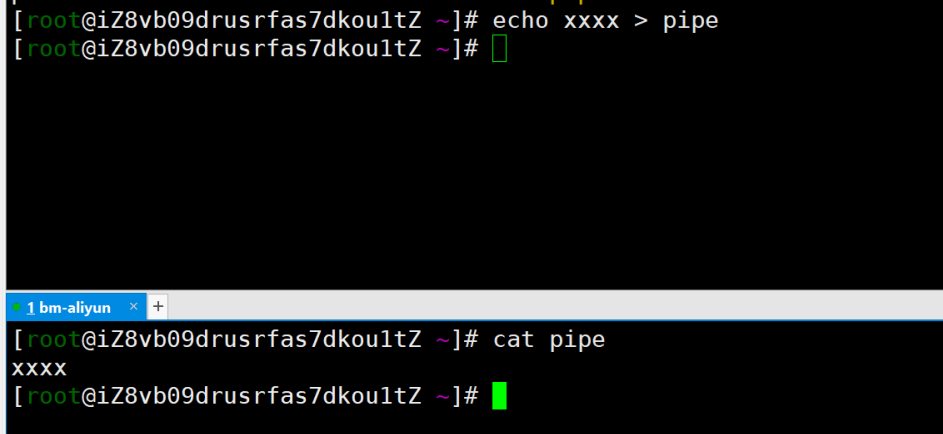
[root@iZ8vb09drusrfas7dkou1tZ ~]# echo xxxx > pipe
- 此时写进程 echo 被阻塞,因为管道另一端没有人读。这是内核对管道文件定义的默认行为。
- 此时如果有进程读这个管道,那么这个写操作的阻塞才会解除。当我们cat完这个文件之后,另一端的echo命令也返回了。这就是命名管道。
- Linux系统无论对于命名管道和匿名管道,底层都用的是同一种文件系统的操作行为,这种文件系统叫pipefs
编程创建管道
- 把匿名管道和命名管道分别叫做PIPE和FIFO。这主要因为在系统编程中,创建匿名管道的系统调用是
pipe(),而创建命名管道的函数是 mkfifo()。使用 mknod() 系统调用并指定文件类型为为 S_IFIFO 也可以创建一个FIFO。
- 方法将会创建出两个文件描述符,可以使用pipefd这个数组来引用这两个描述符进行文件操作。pipefd[0]是读方式打开,作为管道的读描述符。pipefd[1]是写方式打开,作为管道的写描述符。从管道写端写入的数据会被内核缓存直到有人从另一端读取为止。我
#include <unistd.h>
int pipe(int pipefd[2]);
- 命名管道在底层的实现跟匿名管道完全一致,区别只是命名管道会有一个全局可见的文件名以供别人open打开使用。再程序中创建一个命名管道文件的方法有两种,一种是使用mkfifo函数。另一种是使用mknod系统调用
#include <sys/types.h>
#include <sys/stat.h>
int mkfifo(const char *filename, mode_t mode);
int mknod(const char *filename, mode_t mode | S_IFIFO, (dev_t)0);
参考链接
- https://www.cnblogs.com/52php/p/5840229.html
- https://zhuanlan.zhihu.com/p/58489873
基础命令
- https://www.geeksforgeeks.org/basic-shell-commands-in-linux/
- https://swcarpentry.github.io/shell-novice/reference.html
- https://tldr.sh/
- https://command-not-found.com/
示例
- cat/more/less/head/tail
- mkdir/cp/mv/rm/touch
- grep/sort/wc/cut
- ls/cd/du/pwd/man/rmdir/ln/locate/echo/df/tar
- chown/chgrp/chmod
ag
- https://command-not-found.com/ag

- 比 grep find 更强大,更多用于查找关键字
awk
- 主要用于结果处理,可以编程实现自定义功能
- 默认有触发时机,默认每行触发一次
sed
具体脚本示例
计算平均吞吐量
root@aep-shunzi:~/tut_0# cat run_exp.sh
echo "Dummy Experiement Output"
echo "Throughput $RANDOM ops/s"
root@aep-shunzi:~/tut_0# ./run_exp.sh
Dummy Experiement Output
Throughput 18447 ops/s
root@aep-shunzi:~/tut_0# ./run_exp.sh
Dummy Experiement Output
Throughput 18224 ops/s
root@aep-shunzi:~/tut_0# cat run_dummy.sh
# 输入试验次数作为参数
exp_times=$1
# 输入最终的输出文件作为参数
result_file=$2
# 清空输出文件
echo "" > $result_file

# 循环执行
for i in `seq 1 $exp_times`
do
  # 执行吞吐量统计
  # sed 取对应的第二行
  # awk 输出对应的第二列值,即吞吐量对应的数值
  # 重定向到输出文件
	bash ./run_exp.sh | sed -n '2 p' | awk '{print $2}' >> $result_file
done

# 执行求平均值的函数
awk 'BEGIN{cnt=0} {sum+=$1;cnt++;} END {print sum/cnt}' $result_file

root@aep-shunzi:~/tut_0# ls
run_dummy.sh  run_exp.sh  test.txt
root@aep-shunzi:~/tut_0# ./run_dummy.sh 100 avg-thr.txt
16249.1
统计尾延迟的分布
- step1. 构造对应的延迟记录文件 req_time
[root@iZ8vb09drusrfas7dkou1tZ ~]# cat rand_req.sh
# 随机生成延迟
echo "$RANDOM us"
[root@iZ8vb09drusrfas7dkou1tZ ~]# cat run_req.sh
# 循环执行 10001 次
for i in `seq 0 10000`
do
	bash ./rand_req.sh
done
[root@iZ8vb09drusrfas7dkou1tZ ~]# cat run_exp.sh
# 重定向到 req_time 文件
bash ./run_req.sh > req_time
# 接受输入参数作为读取的文件
resultfile=$1

# 按照数字进行排序得到对应排序后的文件

sort -g $resultfile > $resultfile-sort

# 统计 总共的行数
# 提取 wordcount 的输出的第一列 得到行数
lineno=`wc -l $resultfile | awk '{print $1}'`
echo $lineno

# 计算 P99 所在的位置
p99line=$[lineno * 99 / 100]
# 输出 P99 所在的行答应对应的延迟
p99lat=`sed -n "$p99line p " $resultfile-sort`
echo $p99lat

# 统计 CDF 计算概率密度分布
# 读取对应的排序后的延迟文件,从第一行开始,间隔一行取样
# 输出对应的行号所对应的比例值 和 对应的延迟
# 重定向到新的文件中
awk -v total="$lineno" 'BEGIN{line=0} {line++;if(line%2 == 0) print (line/total" "$1)}' $resultfile-sort > $resultfile-cdf